Tuesday, December 11, 2012

... Aussie Christmas Nail Challenge - Elf ...


By now I'm sure regular readers would have realised my sense of humour ... todays theme is "Elf" and while I could go for the traditional green and white colours - all I could think of in my head is this below.


SANTA!!!!! I KNOW HIM!!!!

So here are my Santa nails - really easy to do and I think they look ok considering it's been awhile since I've done any tape manis and I'm really in a lot of pain at the moment after visiting the dentist. Super sensitive teeth = ouch ouch ouch :(
Colours used are Butter London - Pillar Box Red, Ulta 3 - Lily White, Ulta3 - Black Satin and Gosh - Holographic Hero
I should have used a gold for the belt buckle but that's a lesson for next time!!

Monday, December 10, 2012

... Aussie Nails Monday - Delicate ...

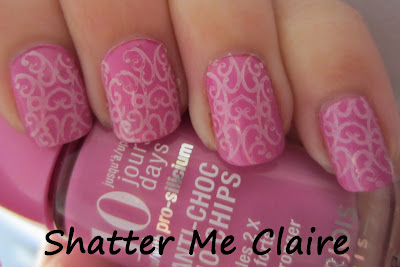
And around rolls another Monday ... todays theme is delicate. I honestly had no idea on what to do for this, so I figured a girly soft colour and I figured stamping makes everything better!
I've chosen Bourjois 26 from the 10 day no chip range as my base. It's a pretty pink and while I've never been lucky enough to get a full 10 days out of this range, it's worth trying if you don't have time to change your polish lately. It's one of the few that survived my "pool test" when I was doing them.

I've stamped on it using Ulta3 white and used the BM 206 plate for my design. It's not the largest design but I found it double stamped quite well.
So there you go - hopefully I'll be back onto Christmas blogging tomorrow.


** Other Aussie Nail Monday Blogs to Visit **

Friday, December 7, 2012

... Aussie Christmas Nail Challenge - Summer Sunset ...

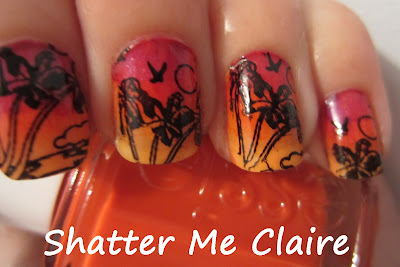
I'm actually really pleased how this one worked out! This is my summer sunset! I've chosen to go for a gradient of oranges, red and a purple and then stamp on the top!
Colours used are ...
B Collection by Bloom - St Tropez
Essie - Meet me at sunset [appropriate!]
Maybelline Colorama - 15 Candy Apple
Maybelline Colorama - 67 Wonder Violet
I've stamped over the top using Ulta3 Black Satin and I've used the stamping plate from Lilic's A04

Wanna see more Aussie Christmas Nails?? Check out the links below!!

Tuesday, December 4, 2012

... Butter London - Pink Ribbon ...

Butter London - Pink Ribbon
Available in stores if you look hard enough! Aussies check out sites like Brand Exclusive where they are on sale regularly
I was asked to do a post on a colour I don't usually wear. I like a challenge!! And a challenge it was as I attempt to wear most colours so it took me awhile to work out what to wear but I ended up deciding on a sheer nude. I hardly ever wear them as they are generally painted opaque ... but here goes.
So this is Pink Ribbon by Butter London and it's basically a real pale pink/beige that's sheer. These shots show 3 coats and there was no issues with drying times or bumps.
 ** Final Verdict **
While this polish isn't for me I can see it's appeal if you don't often wear polish or are not comfortable or allowed to wear loud polishes at work/school etc. It's really easy to apply with fast dry time so I'd give it a thumbs up in that regard.

Monday, December 3, 2012

... Aussie Nails Monday - Glad Wrap ...

And Monday rolls around again ... I know I signed up for the Christmas challenge but I'm going to be picking and choosing either for clashing Mondays. I am not a blogger who can swatch and instantly take it off and redo ... I like to wear my efforts! :)

Anyway ... Today I've gone for ANM which is the Glad Wrap nails. Glad Wrap is the generic term in Australia for plastic wrap ... like how Saran Wrap seems to be the term in the US.

I've chosen to use Cult Nails Bitten from my last mani and see how it works with Gosh Holographic Hero.
I'm actually really pleased with how this turned out for a first try! Generally my first efforts on anything is an embarrassment!

If this look interests you I'd suggest hitting Google for some tutorials but I basically layered a coat of Holographic Hero over the top of Bitten and used a scrunched up ball of Glad Wrap to dab it to create this effect.
I lost most of the holo *sad* but if you squint you can see some appearing through. The rainbow lives on!!


** Other Aussie Nail Monday Blogs to Visit **

Saturday, December 1, 2012

... Aussie Christmas Nail Challenge - Cult Nails -Bitten...

Last year was my first Christmas as a blogger and I really wanted to get into the festive spirit but found it was extremely difficult to get into the mood of challenges when they were all about snow and cold and winter ... bit hard to get imaginative on those themes when it's stinking hot outside and you've been hibernating under the airconditioner for the past week.

But hurrah ... how I'm going to go with this challenge I dunno - especially with clashes on dates with the other Aussie challenge I'm currently participating in - but we'll give it a go!
I got lucky for Day 1 ... I'd been to visit the beautiful Kristy from The Polish Haven yesterday and did my nails there with this fantastic new Cult Nails polish.
This pretty is Bitten and it's definitely unique on my colour wheels. I don't have anything that it's close too and the best I can come up with is that it's like a darker version of Orly Star Spangled.
All these swatches are 3 coats and it had fast drying time and no lumps or bubbles! Really pretty! Seriously! Look at it!!!
** Final Verdict **
I have seriously no complaints about this polish at all. It's pretty to look at, it sparkles, what more could a girl want!!

** Check out these other great blogs participating in the Aussie Christmas challenge!!**

Monday, November 26, 2012

... Aussie Nails Monday - Weather ...


And it's Monday yet again ... I swear it comes around too quick!! Todays Aussie Nails Monday is about weather!

If I'd thought about it I would have just done a holo and proclaimed it to be "rainbow"! But instead I've gone for clouds - kinda like the background of a Mario game!

I've chosen Joe Fresh - Cobalt for the base and the clouds are from the Mash plate Mash37 and stamped in Ulta3 Lily White.
Simple yet I think it's rather effective!! The only downfall I had was using the Joe Fresh polish *sad* At some point it had a spill and it's now not extremely friendly to use. I think it was worth the effort though.


** Other Aussie Nail Monday Blogs to Visit **

Sunday, November 25, 2012

... piCture pOlish - Ariel's Tale ...

piCture pOlish - Ariel's Tale
Available from piCture pOlish - $9.50 AUD

G'day! I've got this super pretty glitter to show you today from piCture pOlish - it's called Ariel's Tale and it's a beautiful mix of shiny green glitters both small and large.

Now I'll say this for the non-bloggers - the key to this polish is to layer it!! If you wear it by itself you will be disappointed because it doesn't look like the magnificence of the bottle but if you add it as a top coat to another polish then ... WOW!!
Here's a skittle assortment of other piCture pOlish colours that I thought worked with Ariel's Tale! Thumb is Peaches n' cream, then Monroe [original], Popsicle, Mad Magenta and Attitude. 

I've purposely tried to keep the holo out of the Monroe and Attitude in these photos just because I wanted to show off the glitter not gorgeous holos ;) But I think it really works on all fingers ... I especially love Mad Magenta with it!
But my favourite layering combination would have to be this ... over piCture pOlish Peacock. Seriously pretty.
I think it looks fantastic and the dark glittery base just worked perfectly with Ariel's Tale! I would highly recommend this combo!!!
All these swatches are 3 coats of the base colour with 2-3 coats of Ariel's Tale and have been topped with a Gel Look top coat with a fast drying top coat which I highly recommend doing if you want to get a week out of these looks! All these glitters lie flat so you don't have the temptation to pick at any lumpy bits! YAY!

** Final Verdict **
The sky is the limit really with the amount of combinations you can pull from this. The green seems to match nicely with every polish I pulled out of the drawer!

Oh and it seems appropriate to leave you with the sea after all that so here ... have a shot from one of the local beaches. The weather has definitely warmed right up so I think I'll be spending a lot of time here!

Polishes were provided for review but all opinions, Aussie humour and dodgy photography are my own!

Monday, November 19, 2012

... Aussie Nails Monday - Glitter ...

It's Monday again! You serious??? Oh man ... this series is going to really prove how much I don't blog. Hmmmm

Anyway todays ANM is Glitter! And I've had this one sitting in my untrieds for WAY too long. Time to remedy that!!
This is Dollish Polish Dino-mite Yoshi layered on China Glaze L8R G8R. Now I knnow L8R G8R is a holographic polish but I've tried in these pics to just show the colour and not the holo since I'm wanting to showcase the glitters!!
I'm actually quite pleased with how this turned out - I'm not the best with matching colours for layering but this worked for me. Dino-mite Yoshi is full of beautiful greens with white, red and orange there too.
Dino-mite Yoshi doesn't dry super smooth but a few coats of top coat and that problem is all sorted for you! Silky smooth!!
Well loved Yoshi is watching you and saying ADD ME TO YOUR WISHLIST!! He is also proving that he definitely needs time in the washing machine soon!!

** Other Aussie Nail Monday Blogs to Visit **

Saturday, November 17, 2012

... Ozotic 907 Beam ...

What a way to kick off a Saturday!! I've got another Ozotic to show you lot today. I'm always intrigued by any polish that seems to pull out the magic right in front of you. ABRACADABRA!!!

This is 907 from the Beam series and it's seriously a versatile polish as it has so many looks!! In the bottle it's shimmery white but when you layer it all these little coloured specks come to life.

Let's start at the beginning. This is 2 coats by itself and it's a sparkling white droolfest! Shimmery and fantastic. It's definitely not a stark white but you could get away with wearing this at the office especially as a single coat would give you a similar look but not as bright.


Next is my favourite - 1 thin coat over black.  You can put a thick coat but the result is the same as 2 coats which I'll show further down. Still pretty but slightly different.

Check out those particles of awesomeness!! They seem to be mainly blue and green but they seem to shift to a purple and a yellow aswell - pretty!!


And here they are again with an extra coat of 907. It still looks great dense and seems to take on a silver feel even but I definitely prefer it with one coat!!


** Final Verdict **
I absolutely love this with 1 coat on black and I can definitely see myself wearing it as a shimmery white again in the future too. A word of caution that you need to make sure you only put thin coats on as you can't go back once you've started. Also you need to work quickly or you will end up with bald spots. I'm really looking forward to seeing the others in this series to see what other looks it provides!!!

Polishes were provided for review but all opinions, Aussie humour and dodgy photography are my own!

Monday, November 12, 2012

... Aussie Nails Monday - Birthday ...

Right-o ... I signed up for a series in hope that I will get motivated. I really enjoy having a set plan of what to blog about otherwise I just procrastinate my blogging time away on Pinterest!

Today "Aussie Nails Monday" is Birthdays!! And this was great timing as my youngest "Mr I-just-turned-6" had a birthday party on the weekend [pics about that will be coming soon as I've been asked a bit about it!!]

He wanted a dress up party and his friends to come as their favourite movie characters.  I ended up just going as someone from Josie and the Pussycats as it's easy to find some cat ears and a long tail.

So here are my nails that I made up to match my "ears" - as you can tell I took these after the party which is why they are looking pretty ragged and feral.


I painted with Ulta 3 Lily white stamped with Face of Australia Molten Metallics in Bronze and as I was pressed for time I used the Bundle Monster BM221 plate for the design.

I tried to double stamp the middle finger but yeah - lesson learnt there. Still looked ok though.


Oh and here is me - one super tired mumma with super bloated puffy face thanks to wisdom teeth!


** Other Aussie Nail Monday Blogs to Visit **

Friday, November 9, 2012

... Ozotic 901 Sugar ...


Ozotic 901 Sugar
Available from piCture pOlish - $12.00 AUD and other network members

Sit down for this one! Today I have the extraordinary Ozotic 901 to show you. Looking at the bottle I honestly wasn't expecting so much jaw-dropping magic. In the bottle it's a sparkly light pink but  LOOK AT IT!!! This is 1 coat on black. Oh yes - 1 COAT!! It's really rare for me to show something as a single coater but this just screams beautiful!!

901 is fantastic flecks of shades of purple, pink and gold that take your breath away! I'll just shut up now and let the pictures do the talking.


* Final Verdict *
I was asked quite a bit about this polish from the people I see during my day [ie school mums!] and not much grabs their attention - but this did. I think everyone needs something like this in their polish stash!!!

Polishes were provided for review but all opinions, humour and dodgy photography are my own!

Friday, November 2, 2012

... Ozotic 914 Scatter Chrome ...

Ozotic 914 Scatter Chrome
Available from piCture pOlish - $12.00 AUD and other network members

These pretties seem to be talked about a lot on my feed since their release so I'm so happy to have my hands on one!! I'm bringing you this beauty today - Ozotic 914 which is one of the new scatter chromes. As the name suggests "Scatter Chrome" is part scatter holographic and part duochrome or in other words "it's AWESOME".

914 shifts from blue to a violet purple and the holographic appears in sunlight as an extra bonus to drool over. I've given this my best shot but my camera refused to capture the true beauty of the purple but I hope you get an idea regardless.

All my swatch shots are 3 coats and like every other Ozotic I own, there are no bumps, lumps or unsightly bits. Real life friends you need to get this!! You don't need any special base coat [or top coat] and you don't need to wait forever for it dry. Really simple stuff!
The shift starts off with a pretty blue ..
Holo in the sun!!!
Slowly changes towards the dark side
But it's still holo!!
Darker ... darker ...
Super Vibrant PURPLE!!!

** Final Verdict **
I love this - it's pretty, it's holo and it changes colour. What more can you want?? There are a lot more pretty purple combinations that it throws at you but I just couldn't get my camera to pick them up. I definitely have no complaints with this beauty!!

Polishes were provided for review but all opinions, humour and dodgy photography are my own!
Powered By Blogger

Total Pageviews